Showing posts with label Make / DIY. Show all posts

DIY Leather Pouch Kit Giveaway

4 Jun 2015


I'm really enjoying making things with leather lately, especially since making these. I have loads of leather projects on my Pinterest craft board that I want to have a go at making. I picked up some beautiful soft grey and blue leather scraps from the car boot sale last week, so I'm looking forward to trying out a few ideas with it.

This leather pouch I've made is a kit from Hammered Leatherworks. They make beautiful leather kits which allow even a complete beginner the chance to try leatherwork. They come with all the materials you need to make the finished product and you can follow the instructions on their you tube channel, which makes so much easier.


One of the sides sewn on...


The second side sewn on... looking like a pouch now!


And the finished pouch with the strap and buckle added.

I think it probably took me a couple of hours to make, the first side being the trickiest. I'm so pleased with how it turned out, it feels really sturdy for something I've made myself and I know it will be treasured for a long time.


I have another Hammered Leatherworks Multi Pouch in natural leather to give away. It would be perfect for keeping your sunglasses in, or as a pen or pencil case or even for your crochet hooks or crafty bits. It would make a lovely present for someone too.

To enter just fill in the Rafflecopter form below. Im happy to post worldwide and the giveaway ends on the 18th June. Good luck! x

a Rafflecopter giveaway

DIY Lazertran Bug Pebbles

23 Apr 2015


DIY Lazertran Bug Pebbles

Lazertran Decal paper is a great way of transferring images onto surfaces such as stone, wood, plaster, ceramic or glass. I used to love playing around with this stuff when I was studying ceramics at uni. I'd decorate plain plates and coffee pots with pictures of The A-Team or She-Ra. If the pieces are fired in a kiln they can be used and washed without the decal coming away. I kind of wish I had kept some now!

To make these bug pebbles I first gave them all a couple of coats of white paint. I used a silk emulsion that I had, but Acrylic would work too.

Using an Inkjet printer, print your images onto the smooth, chalky side of the Lazertran paper and allow the ink to dry for at least 30 minutes. Cut the image to size and soak in some water (about a minute) until the image comes away from the backing paper.


Next paint the pebble surface with a coat of real turpentine - turpentine substitutes or white spirit wont work. Carefully position the decal onto the pebble, smoothing out any air bubbles and leave to dry for a few hours. You could finish the pebbles with a clear varnish, though I decided to just keep mine as they were.

DIY Lazertran Bug Pebbles

I made these dipped pebbles a few weeks ago (you might have seen them if you follow me on Instagram) Again using some emulsion paint, I wrapped a little tape around the centre of the pebble and painted one half.

Dipped Pebble Magnets

Dipped Pebble Magnets

Dipped Pebble Magnets

I thought they would make sweet fridge magnets, so I simply glued some small magnets to the backs using a strong glue.

Dipped Pebble Magnets

I think I'll make the bug pebbles into magnets too - I just need to get some slightly bigger/stronger magnets to stick on!

Have you used Lazertran or decal paper for crafting before?

Do let me know if you make anything similar, I'd love to see it! xx

DIY dip dyed feather wall hanging

8 Feb 2015


DIY dip dyed feather wall hanging

I've been wanting to have a go at dip dyed feathers for a while, and this week I finally tried some out with a bright pink dye I'd bought. I wasn't quite sure what to do with them at first. They looked pretty stood in a little pot, but I wanted to use them in something a bit more decorative and thought I'd try a wall hanging. I love how it looks with just the coloured ends, and the various shades of pink where some feathers have picked up the dye better than others.

DIY dip dyed feather wall hanging

You will need:

White feathers (I used a mix of found and bought ones)
Fabric dye
Bowl for mixing the dye
String
A stick or piece of wooden dowling

DIY dip dyed feather wall hanging

First dip dye the feathers. Using a small-ish bowl, mix up a some of the fabric dye with some warm water. Dip the end of the feathers into the dye and hold for a few seconds. Lay the feathers to dry on some old newspaper or kitchen towel, to protect the surface underneath.

DIY dip dyed feather wall hanging

Once the feathers have dried, attach a small length of string by wrapping it around the ends of the feathers. I tied a feather to each end of the string, and then wrapped it around the wooden dowling.

DIY dip dyed feather wall hanging

To finish, tie another piece of string to each end of the dowling for hanging. x

DIY Wooden Tree Decorations

14 Dec 2014


DIY Wooden Tree Decorations - scraps of us


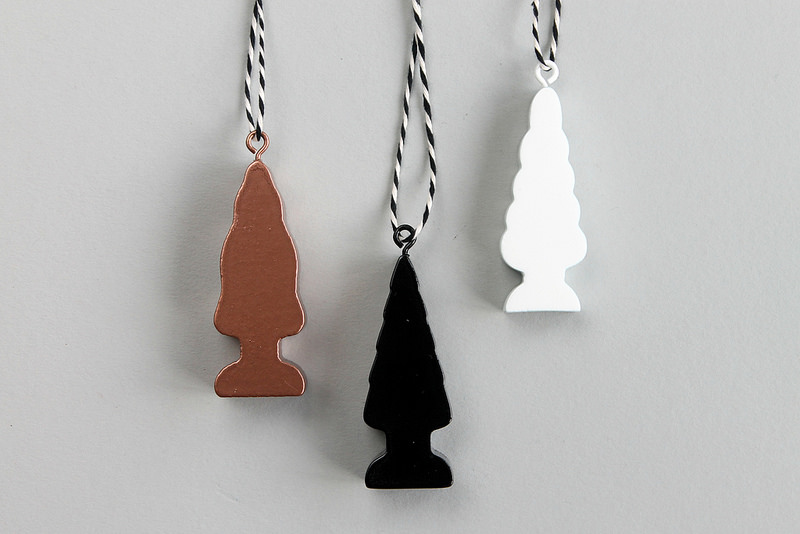
I was playing train tracks with the boy a while ago, standing up the little trees, when I thought what cute Christmas tree decorations they could make. Don't worry though, I didn't take the boys ones! I found a lot of mixed trees and little road signs on Ebay, for just a couple of pounds.


DIY Wooden Tree Decorations


You will need:

Wooden train track trees
Spray paint
Twine, string or ribbon
Bradawl
Pliers
Small screw eyes


DIY Wooden Tree Decorations


First, using the bradawl, make a small hole in the top of the trees to make a starting hole for the screw eyes. Use the pliers to screw the hooks securely into the wood.


DIY Wooden Tree Decorations


Using your chosen colours, spray paint the trees in a well ventilated area. I used these as I already had them from another project.


DIY Wooden Tree Decorations


Once both sides have been sprayed, and they are completely dry, simply tie some lengths of twine or string on to the hooks and they're all ready for hanging!


DIY Wooden Tree Decorations

DIY Wooden Tree Decorations

DIY polymer clay and copper tube necklaces

5 Dec 2014


DIY polymer clay and copper tube necklaces

DIY polymer clay and copper tube necklaces

DIY polymer clay and copper tube necklaces

DIY polymer clay and copper tube necklaces


I've been making lots of polymer clay beads to use in necklaces this week, hopefully to give as extra little Christmas presents. I've made them before with Elizabeth, but this time I thought I'd try and incorporate some different beads too.

I used some wooden geometric beads, which I left natural, but I might try spraying or painting some next time too. I also used some some copper tube beads in a few of the necklaces. These were a little trickier to put together as they are so light in comparison to the clay beads. To keep the tube beads off centre, I just tied some little knots in the wax cord where I wanted them to sit, that way the heavier beads didn't fall to the centre of the necklace.

I quite like how they turned out, especially with the combination of the metal, wood and clay together. I think I might have to keep one or two for myself!

Mini Leather Notebooks DIY

17 Nov 2014


Mini Leather Notebook DIY

Mini Leather Notebook DIY


This year, I really want to try and make a lot of my own Christmas presents. I'm sure I say that every year, and always end up leaving it too late! So, I'm starting now, with the hope I'll have a few little bits and bobs to give come Christmas time.

I bought a bag of leather scraps for a craft project a while ago (from ebay) and had loads left. I thought I'd try using pieces for some mini notebooks.


You will need:

Pieces of leather
Ruler and sharp craft knife
Cutting mat
Paper
Sewing machine
Cottons


First cut a template for the size of your finished notebooks. I made mine 12cm x 16cm as this was a size I was able to fit on most of my scraps of leather. Using a sharp cutting knife, carefully cut around the card template.


Use the same template size to make pages for the inside of your book. I used 5 pieces of thick paper, making 10 sheets inside the notebook. I think my sewing machine might have struggled if I'd used much more than this!

Fold each piece of paper in half and place inside the leather cover. Using the fold lines as a guide, carefully sew down the centre of the notebook. You could use a matching colour cotton, or a contrasting colour, as I did with the bright turquoise and neon pink thread. 

When you fold the notebook back together, you may find the paper sticks out slightly from the leather. I just trimmed along the edge of my pages using a ruler and craft knife, to make a nice flat edge. I also placed my finished notebooks under a heavy book overnight to flatten! 


You could easily make these using some pretty card or thick paper for the covers too!

I'll be sharing a few more present ideas in the run-up to Christmas.


Wishing you all a wonderful week. x


Making Monsters...

28 Oct 2014


The kids are really looking forward Halloween to this year, Elizabeth especially so. She's been talking about it for ages. As soon as Autumn arrived, she got excited because she knew Halloween was around the corner - in her eyes the next celebration between her birthday and Christmas. We went to our first Halloween party last year and I'm guessing that's where the excitement's come from. In previous years they've had costumes, but have just spent it at home, eager to answer the door every time there was a knock, at the anticipation of trick or treaters.

They have both been busy making pictures and Halloween decorations this week, placing them around the house. I thought it would be fun to have a go at creating some Halloween monsters. The kids were so enthusiastic, drawing designs before we started. Elizabeth used her new Moshi Monsters from Argos, as Inspiration. They're still very much her favourite thing at the moment. She spends ages lining them all up in groups and checking which ones she still needs in her Moshi encyclopedia.


To make the monsters, I first covered some tubes and small boxes in coloured paper, ready to decorate. We cut out lots of teeth from white card, and some big eyes with button middles to use alongside the googly ones we had. We then have fun sticking on pipe cleaners, beads, pom poms and lolly sticks.


I just love how they turned out, and it was great to make something the kids could both easily do. Archie often looses interest in crafting, but this held his attention for ages. Plus they're super pleased with the models they made!

I'm not yet sure what we'll actually be doing for Halloween this year. I think I might just do a little tea party for them and a couple of friends. There's so much spooky food Inspiration around on Pinterest at the moment, I might just have to try out a few ideas!

What will you be doing for Halloween?


In association with Argos. 

Painted Pebbles...

27 Oct 2014


I actually picked up these pebbles from the beach over the summer, with the intention of painting them with the kids. For some reason, we never actually got around to it and they'd been sitting on our windowsill since. So, last week, I felt inspired and just painted them myself - feathers, dandelions, shapes, whatever I fancied really. I'd not done any painting for ages and it was lovely to just sit and create something, just because I felt like it!

I'll have to look out for some more nice flat ones at the beach now, so we can all paint some more!

Wishing you all a wonderful week ahead! x