Showing posts with label my makes. Show all posts

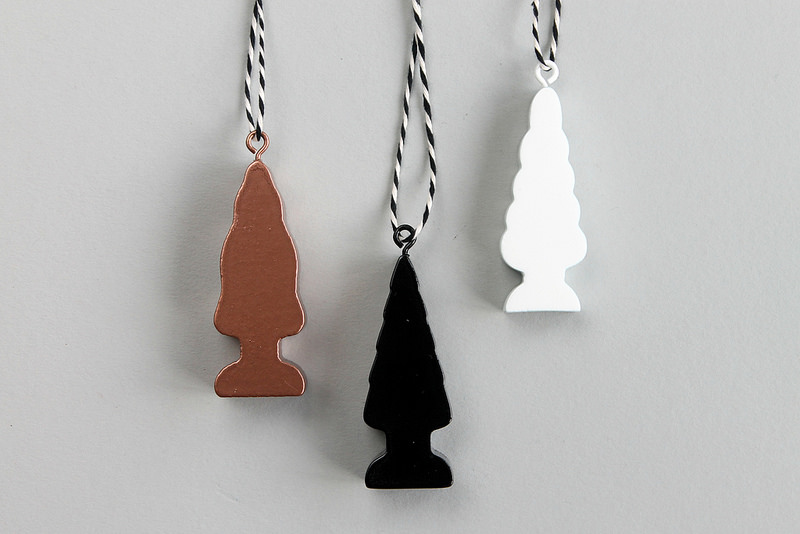
DIY Wooden Tree Decorations

14 Dec 2014


DIY Wooden Tree Decorations - scraps of us


I was playing train tracks with the boy a while ago, standing up the little trees, when I thought what cute Christmas tree decorations they could make. Don't worry though, I didn't take the boys ones! I found a lot of mixed trees and little road signs on Ebay, for just a couple of pounds.


DIY Wooden Tree Decorations


You will need:

Wooden train track trees
Spray paint
Twine, string or ribbon
Bradawl
Pliers
Small screw eyes


DIY Wooden Tree Decorations


First, using the bradawl, make a small hole in the top of the trees to make a starting hole for the screw eyes. Use the pliers to screw the hooks securely into the wood.


DIY Wooden Tree Decorations


Using your chosen colours, spray paint the trees in a well ventilated area. I used these as I already had them from another project.


DIY Wooden Tree Decorations


Once both sides have been sprayed, and they are completely dry, simply tie some lengths of twine or string on to the hooks and they're all ready for hanging!


DIY Wooden Tree Decorations

DIY Wooden Tree Decorations

DIY polymer clay and copper tube necklaces

5 Dec 2014


DIY polymer clay and copper tube necklaces

DIY polymer clay and copper tube necklaces

DIY polymer clay and copper tube necklaces

DIY polymer clay and copper tube necklaces


I've been making lots of polymer clay beads to use in necklaces this week, hopefully to give as extra little Christmas presents. I've made them before with Elizabeth, but this time I thought I'd try and incorporate some different beads too.

I used some wooden geometric beads, which I left natural, but I might try spraying or painting some next time too. I also used some some copper tube beads in a few of the necklaces. These were a little trickier to put together as they are so light in comparison to the clay beads. To keep the tube beads off centre, I just tied some little knots in the wax cord where I wanted them to sit, that way the heavier beads didn't fall to the centre of the necklace.

I quite like how they turned out, especially with the combination of the metal, wood and clay together. I think I might have to keep one or two for myself!

Mini Leather Notebooks DIY

17 Nov 2014


Mini Leather Notebook DIY

Mini Leather Notebook DIY


This year, I really want to try and make a lot of my own Christmas presents. I'm sure I say that every year, and always end up leaving it too late! So, I'm starting now, with the hope I'll have a few little bits and bobs to give come Christmas time.

I bought a bag of leather scraps for a craft project a while ago (from ebay) and had loads left. I thought I'd try using pieces for some mini notebooks.


You will need:

Pieces of leather
Ruler and sharp craft knife
Cutting mat
Paper
Sewing machine
Cottons


First cut a template for the size of your finished notebooks. I made mine 12cm x 16cm as this was a size I was able to fit on most of my scraps of leather. Using a sharp cutting knife, carefully cut around the card template.


Use the same template size to make pages for the inside of your book. I used 5 pieces of thick paper, making 10 sheets inside the notebook. I think my sewing machine might have struggled if I'd used much more than this!

Fold each piece of paper in half and place inside the leather cover. Using the fold lines as a guide, carefully sew down the centre of the notebook. You could use a matching colour cotton, or a contrasting colour, as I did with the bright turquoise and neon pink thread. 

When you fold the notebook back together, you may find the paper sticks out slightly from the leather. I just trimmed along the edge of my pages using a ruler and craft knife, to make a nice flat edge. I also placed my finished notebooks under a heavy book overnight to flatten! 


You could easily make these using some pretty card or thick paper for the covers too!

I'll be sharing a few more present ideas in the run-up to Christmas.


Wishing you all a wonderful week. x


Painted Pebbles...

27 Oct 2014


I actually picked up these pebbles from the beach over the summer, with the intention of painting them with the kids. For some reason, we never actually got around to it and they'd been sitting on our windowsill since. So, last week, I felt inspired and just painted them myself - feathers, dandelions, shapes, whatever I fancied really. I'd not done any painting for ages and it was lovely to just sit and create something, just because I felt like it!

I'll have to look out for some more nice flat ones at the beach now, so we can all paint some more!

Wishing you all a wonderful week ahead! x

Driftwood Feather Holder DIY....

17 Oct 2014


Since we've been making our collections, we've managed to gather together quite a few different feathers. We do have a little pot for them, but I also wanted to make something we could put a few of our favourite feathers in, as a way of displaying them. I used this piece of driftwood collected from the beach and drilled some holes for them to stand in. The kids really love this, choosing which feathers to position where.


You will need -

* A piece of driftwood or other wood
* Feathers
* Pen and ruler
* Drill


First choose your piece of wood. I quite liked the chunkiness of this piece and it also had nice flat edges, making it easier to drill the holes.


Mark out where you would like the holes to be, making sure there is plenty of space for each feather. I used a white chalk pen so I was able to see the markings clearly, and could also remove any mistakes easily.

Drill the holes into the piece of wood, going in about an inch or so. I used a slightly thicker drill bit for the back holes so I could put the bigger ones with a thicker quill behind, and the thinner and shorter ones at the front.


And that's it! Once the holes are drilled you can play around with the positioning of your feathers.

Let me know if you try anything similar, I'd love to see it!

*****

Happy Friday, wishing you all a super weekend! xx

Leaf Crown...

8 Oct 2014


On the weekend, Elizabeth and I made a leaf crown, using some leaves and feathers we'd collected at the park the previous day. It was a sweet little project to do together and she loved wearing it for the rest of the afternoon!

To make the crown, we used a length of bias binding and glued along the inside of the fold. We then selected the leaves and cut off the ends to make a flat edge. We placed the leaves all the way along the inside of the binding and once complete folded the edge over, making sure all the leaves were secure inside. To finish, we measured the crown around the head and secured at the back with a couple of staples.

The leaves actually went a bit floppy after a while, so I think this would work better with something a little taller to support them. A piece of folded card to tuck the leaves inside could work well. That way they could always decorate the band afterwards with ribbon or sequins.

DIY Pressed Flowers Plates

24 Sept 2014


I have really enjoyed pressing flowers with the kids this Summer, we have quite a collection now. I especially love these Hydrangea blooms with their varying colours, picked at different stages. I wanted to create something where I could display some of the flowers and came up with this Idea for some decorated plates for hanging. I used some cheap white plates I picked up, but this could easily work with some vintage plates too!

You will need:

▲ Pressed flowers
▲ Plates
▲ Mod Podge or PVA glue
▲ Small brush
▲ Sticky plate hangers for hanging
▲ Cotton buds or wipes


1. First decide on the positioning of the flowers on your plates. I took a quick picture on my phone once I was happy with the arrangement, so that I could refer back to it whilst sticking them down.


2. Use a small brush to paint on a thin layer of Mod Podge or glue. Adhere to the plate, gently pressing down the petals.


3. Continue to stick down all the flowers in place. Use a cotton bud to wipe away any excess glue from around the edges of the flowers.


4. Once the plates are complete, use sticky plate hangers to hang the finished plates on the wall! You could try a line of plates running down, or maybe decorate various sizes and colours and hang at random possitions.


Do you have any Ideas for using pressed flowers? I'd love to hear them! xx

Sun prints... and a giveaway

15 Aug 2014


I haven't tried making sun prints since I was at primary school. I can still remember being amazed by the magic of removing the objects from the paper, revealing the silhouettes left behind.

I bought a pack to do with the kids over the holidays and they really enjoyed it. Especially searching around the house for suitable objects to use. We found the flat items like the dried flowers worked best, as we could place some clear acetate over them, giving a really crisp edge.

To make:

You will need - sun print paper, acetate or a sheet of plastic or glass, a bowl of water and some interesting objects to print

▲ First gather together all your chosen items, some acetate or a piece of glass to keep down flat or light objects and a bowl of water.

▲ Next arrange your items on to the sun print paper. You will need to either do this quickly, or somewhere the sun's light cannot reach the paper, which is what I did. Apply the plastic sheet or acetate over the objects.

▲ Once all the items are in place, you will need to place the paper in direct sun light for a few minutes (or following manufacturers instructions) until the paper is exposed.

▲ Finally remove all the objects from the paper and submerge into cool water for a couple of minutes. The blue will turn to white, and the white to blue. Lay the paper flat to dry.


I just love how they turned out, I think they'd look great put in some frames. It was such a simple and no-mess project. I'd love to do this again in the Autumn too, with a collection of different shaped leaves or seed pods.

I also have another pack of sun print paper to giveaway...

The giveaway will end on the 25th August and I am happy to post worldwide.

Have a wonderful weekend! x

a Rafflecopter giveaway

Congratulations Laura! If you could email me your address and I'll get the pack in the post to you. x

Acrylic flower tray...

14 Aug 2014


As you probably know, I do love using flowers and other natural finds to make pictures. I love arranging them into neat patterns or pretty designs before photographing them. I'd had an idea of making a tray decorated with a floral design for a while now. I'd thought about the possibility of using resin to create a protective layer over pressed flowers, but when I saw these acrylic trays from Tiny Prints I knew it would work perfectly for what I had in mind.      

Using a photograph printed on to the tray in this way, meant I was able to create a design with a little more depth and was able to mess about with the layout and editing of the picture until I was happy with the end result!


I'm loving hydrangea flowers lately and their variations of colour, so I used mostly those and a few other bits picked from the garden too!

I cut a piece of black card twice the size of the finished tray to use as my base. I then started chopping and arranging the flowers to make a fairly busy design, but with plenty of white space also. I placed the cornflowers and a couple of other flowers upside down so I could get them to sit straight.


This was the finished photograph once I'd faffed around with the positioning of the flowers.


And this is the final tray! I love how it turned out and how vivid all the colours are against the black. I think it would make a great place to keep jewellery and trinkets or for make-up!